Build a Login ID screen using ACUL
`
To use Auth0 services, you’ll need to have an application set up in the Auth0 Dashboard. The Auth0 application is where you will configure how you want authentication to work for the project you are developing.
Configure an application
Use the interactive selector to create a new Auth0 application or select an existing application that represents the project you want to integrate with. Every application in Auth0 is assigned an alphanumeric, unique client ID that your application code will use to call Auth0 APIs through the SDK.
Any settings you configure using this quickstart will automatically update for your Application in the Dashboard, which is where you can manage your Applications in the future.
If you would rather explore a complete configuration, you can view a sample application instead.
Configure Callback URLs
A callback URL is a URL in your application that you would like Auth0 to redirect users to after they have authenticated. If not set, users will not be returned to your application after they log in.
Configure Logout URLs
A logout URL is a URL in your application that you would like Auth0 to redirect users to after they have logged out. If not set, users will not be able to log out from your application and will receive an error.
Configure Allowed Web Origins
An Allowed Web Origin is a URL that you want to be allowed to access to your authentication flow. This must contain the URL of your project. If not properly set, your project will be unable to silently refresh authentication tokens, so your users will be logged out the next time they visit your application or refresh a page.
Use Auth0 CLI to enable ACLU Login ID screen in your tenant.
In the root directory of your project, save the settings.json file.
Enable ACUL by running the following command in your terminal:
auth0 ul customize --rendering-mode advanced --prompt login-id --screen login-id --settings-file ./settings.jsonWas this helpful?
Use one of the sample apps provided by Auth0 to initiate Universal Login
In the root folder of your project, clone the Auth0 sample application using the following command:
git clone https://github.com/auth0-samples/auth0-react-samplesWas this helpful?
Change directory to the auth0-react-samples/Sample-01 folder and install the sample application using the following command:
cd auth0-react-samples/Sample-01
npm install
Was this helpful?
Change directory to the auth0-react-samples/Sample-01/src folder and add the auth_config.json file. Edit the file to add your tenant's Custom Domain.
Run the application
npm run devWas this helpful?
checkpoint.header
Open your application (default: http://localhost:3000)
Select the Log In button on the sample app
You should be redirected to your Auth0 domain
After selecting Log In, you should see a blank page.
This is expected! It means Auth0 is trying to load your custom UI assets, which we have not created yet.
Run a single-page application to build custom login screens.
Configure the Boilerplate application
1. In the root folder of your project, open a new terminal and clone the Auth0 boilerplate application using the following command:
git clone https://github.com/auth0-samples/auth0-acul-react-boilerplateWas this helpful?
2. Change directory to the auth0-acul-react-boilerplate folder and install the application and the ACUL JS SDK.
// open the directory where you git clone the boilerplate
cd auth0-acul-react-boilerplate && npm i
// Install the ACUL JS SDK
npm install @auth0/auth0-acul-js
Was this helpful?
3. Build the application
npm run buildWas this helpful?
4. Serve the assets
npx http-server dist -p 8080Was this helpful?
checkpoint.header
After selecting Log In, you are greeted with a “Hello World” page.
Build the ACUL Login ID screen
Change directory to the auth0-acul-react-boilerplate/src/screens/loginId/ and edit the index.tsx file.
Rebuild the application with the following command:
npm run buildWas this helpful?
checkpoint.header
Select Log In.
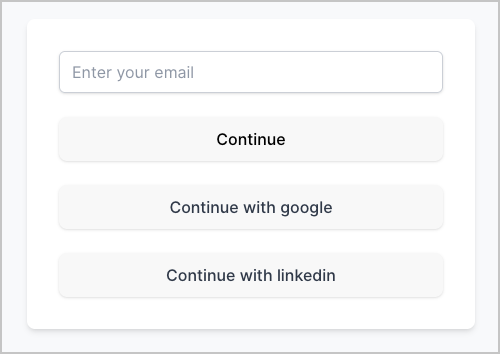
You should now see a customized login page as shown below:

Next Steps
Excellent work! If you made it this far, you should now have login, logout, and user profile information running in your application.
This concludes our quickstart tutorial, but there is so much more to explore. To learn more about what you can do with Auth0, check out:
- Auth0 Dashboard - Learn how to configure and manage your Auth0 tenant and applications
- auth0-acul-js SDK - Explore the SDK used in this tutorial more fully
- Auth0 Marketplace - Discover integrations you can enable to extend Auth0’s functionality
- Configure other identity providers
- Enable multifactor authentication
- Learn about attack protection
- Learn about rules

Sign up for an or to your existing account to integrate directly with your own tenant.